ESP32-CAM Presence Sensor
As we all do, I have a bunch of Wiz lights in my house and one of their motion sensors. But I want my motion sensor not to turn off when I'm sitting And I also want to control the lights locally as I don't like all smart home thing going to the cloud. So I decided to take one of my ESP32-CAM boards I have lying around, and buy a LD2410 Presence sensor and start a new project.
Planning
So this project has quite a few parts, even for this MVP. We discussed how to pick the parts and create tasks here
Starting To Code
First thing first is I need to recreate my WIZ control scheme from node in C and in order to do that I need to figure out how to send and receive UDP requests.
So we start by adding the Wi-Fi boilerplate code to connect to Wi-Fi, initialize the UDP service
void  setup() {
	Serial.begin(115200);
	WiFi.begin(ssid, password);
	while (WiFi.status() != WL_CONNECTED) {
	dela(1000);
	Serial.println("Connecting to WiFi...");
}
Serial.println("Connected to WiFi");
udp.begin(localPort);
}
And the code to actually send a discovery request to the lamps and read the responses:
void  sendBroadcast() {
	udp.beginPacket(IPAddress(255,255,255,255), localPort); // broadcast address
	udp.print("{\"method\":\"getPilot\",\"params\":{}}");
	udp.endPacket();

	delay(150);

	int packetSize = udp.parsePacket();
	byte p = 0;
	while (packetSize) {
		char  incomingPacket[255];
		int len = udp.read(incomingPacket, 255);
		incomingPacket[len] = 0;
		Serial.printf("Received %d bytes from %s: %s\n", packetSize, udp.remoteIP().toString().c_str(), incomingPacket);
		packetSize = udp.parsePacket();
		p++;
	}
}
Now we run the code in a board to see if it works, and we discover that it won't compile because we are missing a semicolon.

Saving IPs
The discovery UPD packets just gives us a list of responses from all the lights in our house, so now we need to differentiate the lamps. For this we need to parse the response JSON and get the mac address from each lamp as that the only differentiating feature. Once that's done, we compare those with a stored list of lamps to be controlled and save their IP's
IPs are just a 4 byte array. So we will store just bytes, but because I'm just running this in a home network I can risk it and just store the lat number of the array as the other 3 will remain constant for most people. We do have a few options to go with:
- https://github.com/arkhipenko/Dictionary uses binary search.
- allows us to leave unused lamps alone if not found and only update found ones
- A linked strict list.
- 2 ordered lists.
Because I have a MAC address ordered list already, I'll go with the ordered list approach because I can then just cycle the IP list to control the different lights.
const  char* targetLights[] = LIGHTS_ARRAY; //this one is defined by us in the secrets.h file
const  int arraySize = sizeof(targetLights) / sizeof(targetLights[0]);
// becasue this is c we need to allocate the memory
byte *ipArr = (byte*)malloc(sizeof(byte)*arraySize);

int  isTargetLight(const  char*  target) {
	for (int i = 0; i < arraySize; i++) {
		if (strcmp(target, targetLights[i]) == 0) {
			return i;
		}
	}
	return -1;
}
In the packet handler, we add:
int lampIndex = isTargetLight(doc["result"]["mac"]); // we get the mac and compare it with the array
if(lampIndex >= 0){
	ipArr[lampIndex] = udp.remoteIP()[3]; // and store it in the right place in the list
}
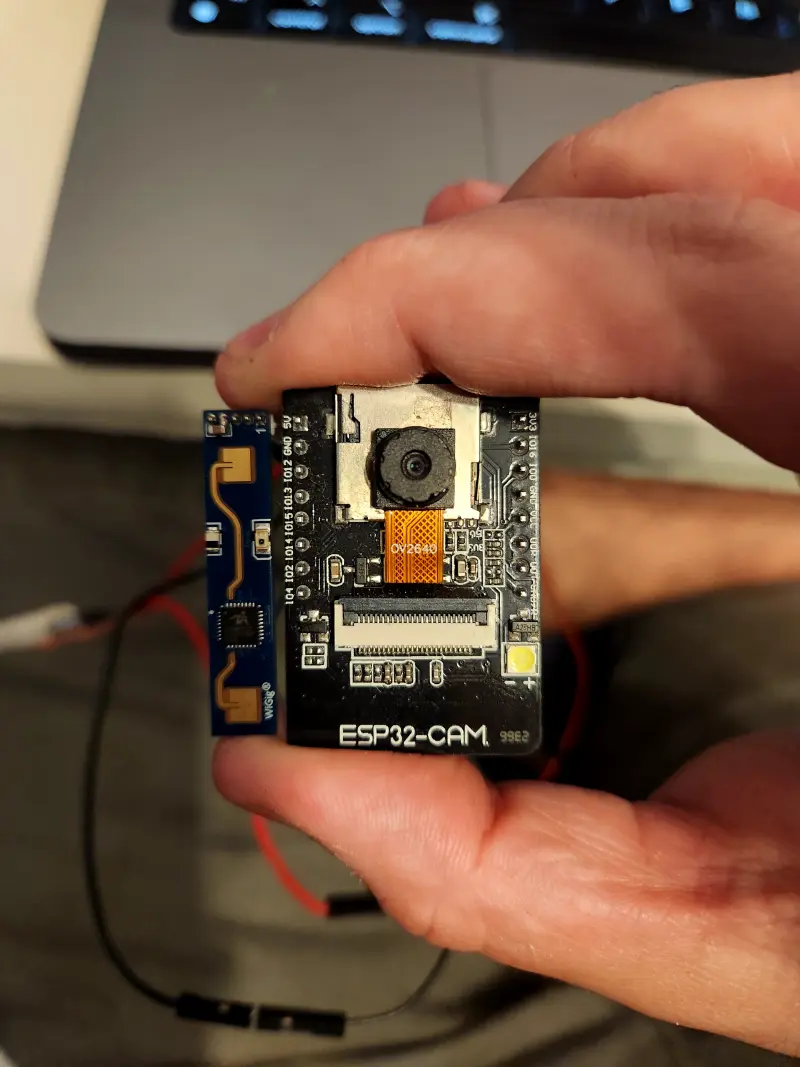
The radar
First, we need to connect the radar up physically. The radar needs power (I plugged it in directly to the usb-c breakout board as it consumes quite a bit of power), a serial connection and the output pin.
Then we can add some example code to give it a try:
Stationary target: 71cm energy:100 Moving target: 38cm energy:100
Stationary target: 73cm energy:100 Moving target: 48cm energy:71
Stationary target: 43cm energy:100
Stationary target: 30cm energy:100
Stationary target: 64cm energy:100 Moving target: 35cm energy:100
Now that we know it works, we can move on.
Controlling Lights
We have the radar Data running and that's great, but we don't want to poll the radar on every cycle to see if it's sensing a person. So instead we will use the OUTPUT pin. To read it we set up a new input pin and we set up an interrupt on it.
bool changeToHigh = 0;
bool changeToLow = 0;

void  setup() {
	...
	pinMode(RADAR_OUT_PIN, INPUT);
	attachInterrupt(RADAR_OUT_PIN, ISR, CHANGE);
}

void IRAM_ATTR ISR(){
	if (digitalRead(RADAR_OUT_PIN) == HIGH) {
		changeToHigh = 1;
	} else {
		changeToLow = 1;
	}
}
- interrupts need to have the
IRAM_ATTRflag on them, that way they are always in ram. - The interrupt has minimal code, so it runs as quickly as possible. It only sets up flags to run some code later in the main loop.
In the main loop, we read those flags and perform the actual USP packet broadcast to switch the lights on and off.
Clean Up
At this point, the basic functionality is done. Now we can add some error detection, specially checking if we have ram for the IP array and if the Wi-Fi is disconnected. Both cases will just cause a reboot. We should also split the code int o separate files for better reading. Remember that because this is C we need to create a new .cpp file and a header (.h) file that will be imported both in the file where we want to use it and in the .cpp file that implements it
Web Service

Well at this point the sensor works but because it has a camera and Wi-Fi I'll add some extra boiler place web server code I had lying around, so we can use it as a security camera and get some data from the radar to calibrate it. Here is some data on how to configure the sensitivity.
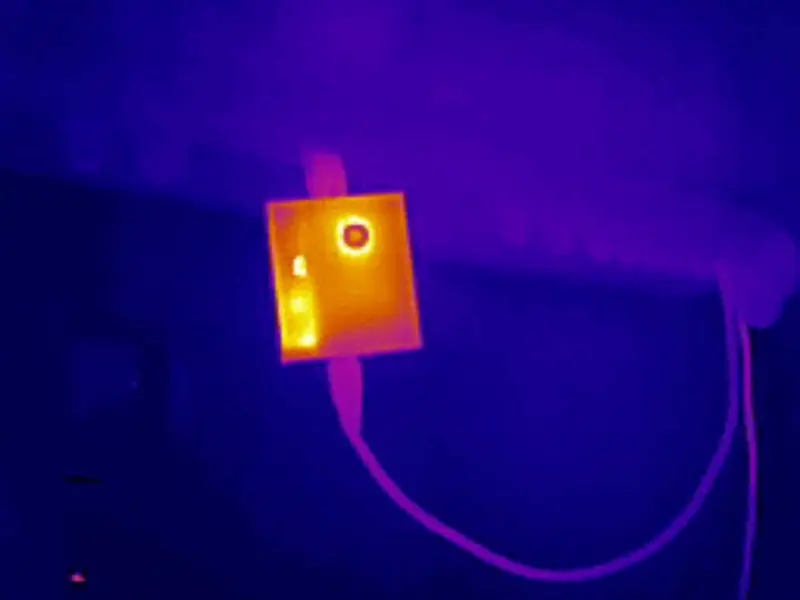
Case
Well, unlike most coding projects this one include a physical part, so we need to design a case for it, not only to make it look nice, but also to be able to position it. In My case I'll hang it from a curtain rail, so I'll quickly design and print a case with some press fit hook that fits the rail.

I dont have the set up to take 3d print timelapses.
The radar does heat up enough to be clearly visible through the case in infrared:
Conclusion
At this point, we just flash the final software and assemble everything. The sensor works great, not having to deal with timers and motion sensors.
- All the code is available here: https://github.com/idegre/ESP32-presence-Sensor
- 3DModels: